X86 Windows上预测部署示例
1 C++预测部署示例
C++示例代码在链接,下面从流程解析和编译运行示例两方面介绍。
1.1 流程解析
1.1.2 准备预测模型
使用Paddle训练结束后,得到预测模型,可以用于预测部署。
本示例准备了mobilenet_v1预测模型,可以从链接下载,或者wget下载。
wget https://paddle-inference-dist.cdn.bcebos.com/PaddleInference/mobilenetv1_fp32.tar.gz
1.1.3 包含头文件
使用Paddle预测库,只需要包含 paddle_inference_api.h 头文件。
#include "paddle/include/paddle_inference_api.h"
1.1.4 设置Config
根据预测部署的实际情况,设置Config,用于后续创建Predictor。
Config默认是使用CPU预测,可以设置开启MKLDNN加速、设置CPU的线程数、开启IR优化、开启内存优化。
paddle_infer::Config config;
if (FLAGS_model_dir == "") {
config.SetModel(FLAGS_model_file, FLAGS_params_file); // Load combined model
} else {
config.SetModel(FLAGS_model_dir); // Load no-combined model
}
config.EnableMKLDNN();
config.SetCpuMathLibraryNumThreads(FLAGS_threads);
config.SwitchIrOptim();
config.EnableMemoryOptim();
1.1.5 创建Predictor
std::shared_ptr<paddle_infer::Predictor> predictor = paddle_infer::CreatePredictor(config);
1.1.6 设置输入
从Predictor中获取输入的names和handle,然后设置输入数据。
auto input_names = predictor->GetInputNames();
auto input_t = predictor->GetInputHandle(input_names[0]);
std::vector<int> input_shape = {1, 3, 224, 224};
std::vector<float> input_data(1 * 3 * 224 * 224, 1);
input_t->Reshape(input_shape);
input_t->CopyFromCpu(input_data.data());
1.1.7 执行Predictor
predictor->Run();
1.1.8 获取输出
auto output_names = predictor->GetOutputNames();
auto output_t = predictor->GetOutputHandle(output_names[0]);
std::vector<int> output_shape = output_t->shape();
int out_num = std::accumulate(output_shape.begin(), output_shape.end(), 1,
                              std::multiplies<int>());
std::vector<float> out_data;
out_data.resize(out_num);
output_t->CopyToCpu(out_data.data());
1.2 编译运行示例
1.2.1 编译示例
文件model_test.cc 为预测的样例程序(程序中的输入为固定值,如果您有opencv或其他方式进行数据读取的需求,需要对程序进行一定的修改)。文件CMakeLists.txt 为编译构建文件。
根据前面步骤下载Paddle预测库和mobilenetv1模型。
使用cmake-gui程序生成vs工程:
选择源代码路径,及编译产物路径,如图所示
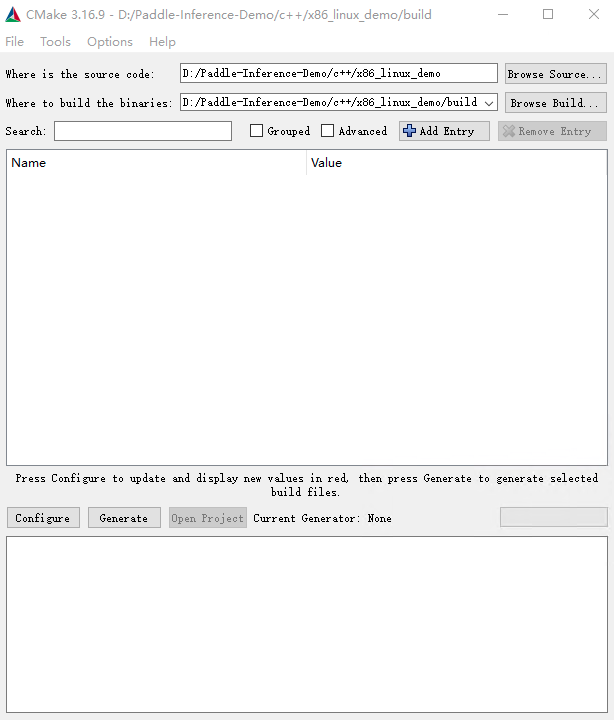 win_x86_cpu_cmake_1
点击Configure,选择Visual Studio且选择x64版本如图所示,点击Finish,由于我们没有加入必要的CMake Options,会导致configure失败,请继续下一步。
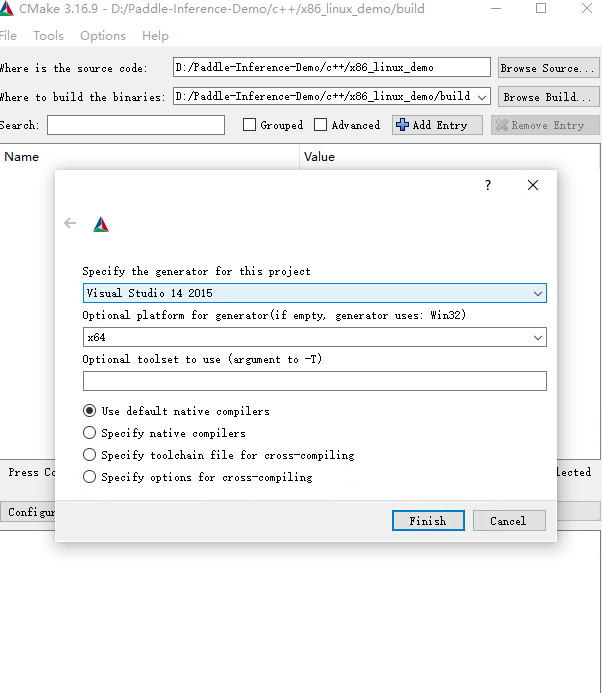 win_x86_cpu_cmake_2
设置CMake Options,点击Add Entry,新增PADDLE_LIB,CMAKE_BUILD_TYPE,DEMO_NAME等选项。具体配置项如下图所示,其中PADDLE_LIB为您下载的预测库路径。
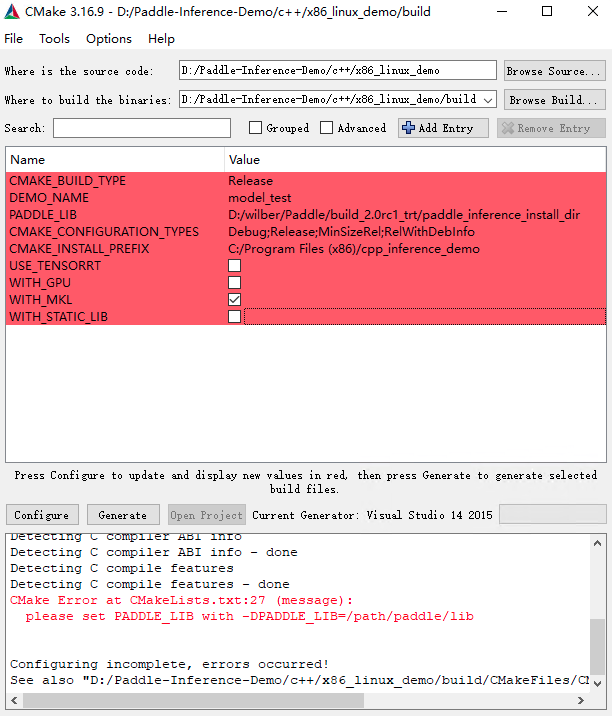 win_x86_cpu_cmake_3
点击Configure,log信息显示Configure done代表配置成功,接下来点击Generate生成vs工程,log信息显示Generate done,代表生成成功,最后点击Open Project打开Visual Studio.
设置为Release/x64,编译,编译产物在build/Release目录下。
 win_x86_cpu_vs_1
1.2.2 运行示例
首先设置model_test工程为启动首选项。
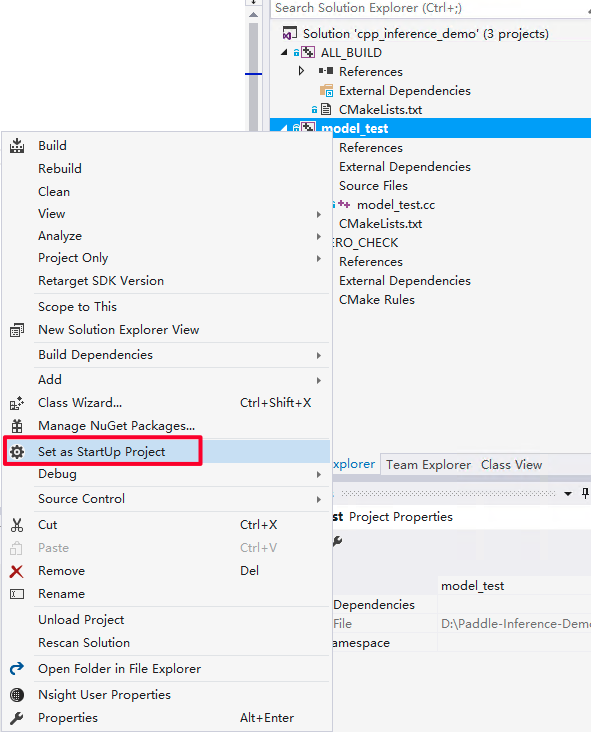 win_x86_cpu_vs_2
配置输入flags,即设置您之前下载的模型路径。点击Debug选项卡的model_test Properities..
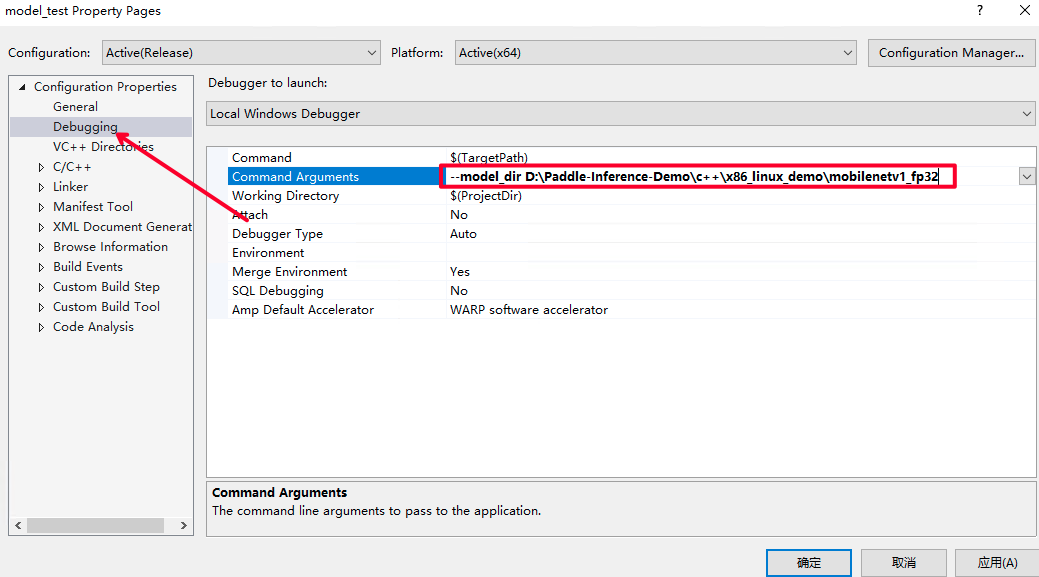 win_x86_cpu_vs_3
点击Debug选项卡下的Start Without Debugging选项开始执行程序。
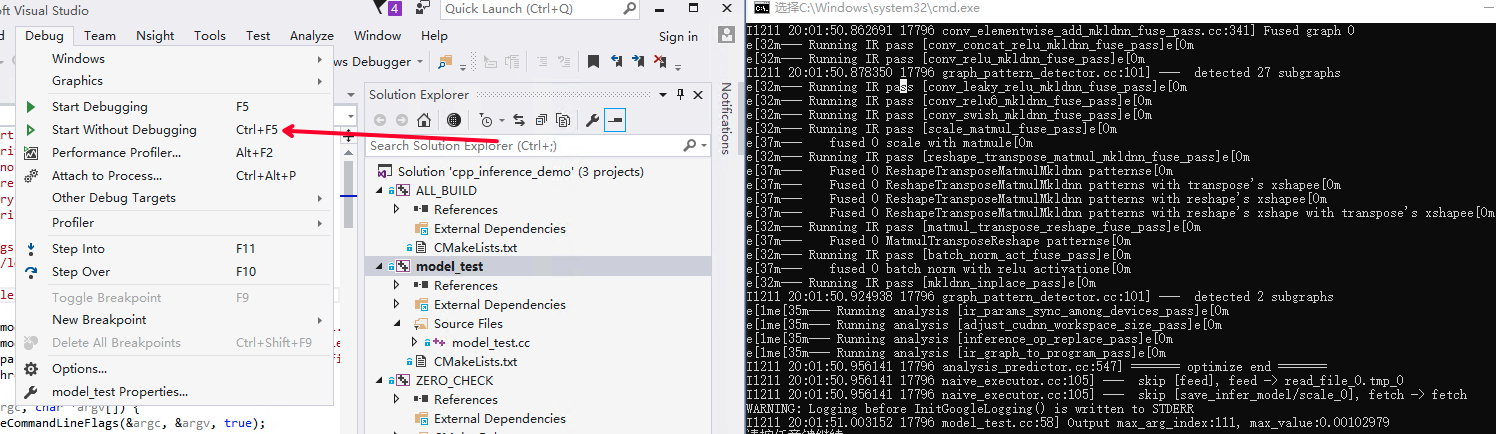 win_x86_cpu_vs_4
2 Python预测部署示例
Python预测部署示例代码在链接,下面从流程解析和编译运行示例两方面介绍。
2.1 流程解析
2.1.2 准备预测模型
使用Paddle训练结束后,得到预测模型,可以用于预测部署。
本示例准备了mobilenet_v1预测模型,可以从链接下载,或者wget下载。
wget https://paddle-inference-dist.cdn.bcebos.com/PaddleInference/mobilenetv1_fp32.tar.gz
tar zxf mobilenetv1_fp32.tar.gz
2.1.3 Python导入
from paddle.inference import Config
from paddle.inference import create_predictor
2.1.4 设置Config
根据预测部署的实际情况,设置Config,用于后续创建Predictor。
Config默认是使用CPU预测,可以设置开启MKLDNN加速、设置CPU的线程数、开启IR优化、开启内存优化。
# args 是解析的输入参数
if args.model_dir == "":
    config = Config(args.model_file, args.params_file)
else:
    config = Config(args.model_dir)
config.enable_mkldnn()
config.set_cpu_math_library_num_threads(args.threads)
config.switch_ir_optim()
config.enable_memory_optim()
2.1.5 创建Predictor
predictor = create_predictor(config)
2.1.6 设置输入
从Predictor中获取输入的names和handle,然后设置输入数据。
img = cv2.imread(args.img_path)
img = preprocess(img)
input_names = predictor.get_input_names()
input_tensor = predictor.get_input_handle(input_names[0])
input_tensor.reshape(img.shape)
input_tensor.copy_from_cpu(img.copy())
2.1.7 执行Predictor
predictor.run();
2.1.8 获取输出
output_names = predictor.get_output_names()
output_tensor = predictor.get_output_handle(output_names[0])
output_data = output_tensor.copy_to_cpu()
2.2 编译运行示例
文件img_preprocess.py是对图像进行预处理。
文件model_test.py是示例程序。
参考前面步骤准备环境、下载预测模型。
下载预测图片。
wget https://paddle-inference-dist.bj.bcebos.com/inference_demo/python/resnet50/ILSVRC2012_val_00000247.jpeg
执行预测命令。
python model_test.py --model_dir mobilenetv1_fp32 --img_path ILSVRC2012_val_00000247.jpeg
运行结束后,程序会将模型结果打印到屏幕,说明运行成功。